
What is the purpose of the hosts file?
The hosts file (present by default in unix systems under /etc/hosts) is the first step in translating a fully qualified domain name (FQDN) into an IP address.
This is the file that is queried first before making a DNS request to the web's address servers.
Therefore, for each name configured in this file with an IP address after a space, a connection will be opened to the indicated IP address.
It therefore functions like a telephone directory.
If this address is 127.0.0.1 (myself) the connection will try to make itself on localhost, i.e., the own machine.
If a server exists on the machine itself, the internal server will be accessed; if the server does not exist, nowhere will be accessed.
The IP address of localhost is written as 127.0.0.1 in IPv4 and ::1 in IPv6.
On machines with IPv6 enabled, both can therefore be written.
The use explained below is therefore a misuse of its function in order to block access to certain sites.
Why modify the hosts file?
The hosts file is consulted every time a website is accessed, much like an address book. If the site is listed in the hosts file, access is blocked if the address is 127.0.0.1. However, if it is not found in the file, your internet service provider (ISP) will connect you to the IP address of the requested site.
By modifying the hosts file, you will be able to:
block access to certain sites, speed up access to sites you prefer and whose IP address you know, bypass the blocking of access to security sites caused by certain harmful programs.
How do I edit the hosts file?
Where is the original hosts file located? The original hosts file is located here:
C:\WINDOWS\system32\drivers\etc\hosts
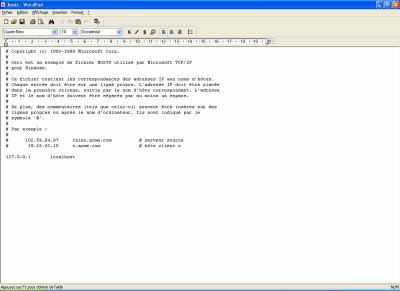
What does it contain? It should contain this if it is intact:
Copyright (c) 1993-1999 Microsoft Corp. This is a sample HOSTS file used by Microsoft TCP/IP for Windows. This file contains the mappings of IP addresses to hostnames. Each entry must be on a separate line. The IP address must be placed in the first column, followed by the corresponding hostname. The IP address and hostname must be separated by at least one space. Additionally, comments (such as this one) may be inserted on separate lines or after the computer name. They are indicated by the symbol '#'. # # For example: # # 102.54.94.97 rhino.acme.com # source server # 38.25.63.10 x.acme.com # client host x 127.0.0.1 localhost
If you have the same text as above, it's clean, but it's not very useful!
Modification method
The first thing to do is open your preferred text editor, such as Notepad, in administrator mode. This is done by navigating to the Start menu -> right-clicking on WordPad, for example -> Run as administrator.
Once the text editor is open, go to File -> Open and navigate to the hosts file (C:\WINDOWS\system32\drivers\etc\hosts).
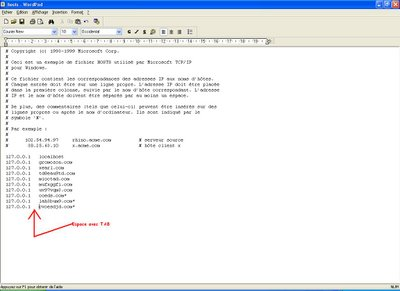
Now we're going to do something very useful: add sites to block.
Select this: (note the space of one tab (TAB) between 127.0.0.1 and gromozon.com)
127.0.0.1 gromozon.com 127.0.0.1 xearl.com 127.0.0.1 td8eau9td.com 127.0.0.1 mioctad.com 127.0.0.1 mufxggfi.com 127.0.0.1 uv97vqm3.com 127.0.0.1 coeds.com* 127.0.0.1 lah3bum9.com* 127.0.0.1 cvoesdjd.com*
Once finished, your file should look like this:
Obviously, you can add as many addresses as you want.
There are also ready-made lists of Hosts…
Be aware, however, that if your hosts file becomes large, it may cause a problem with the Windows ClientDNS service, which would be redundant.
(which puts an svchost process at 99% in your Task Manager) so, be careful…
You simply need to disable this service if you want to use a large hosts file:
Start / Run / type services.msc / find ClientDNS in the right-hand column / set it to "Disabled"
Example with MVPS HOSTS:
Download this: http://winhelp2002.mvps.org/hosts.zip
Unzip the archive and place the HOSTS file in the following folder: C:\Windows\system32\drivers\etc
Some addresses should be blocked in your firewall: (IP Ranges)
To summarize, if you happen to come across one of these addresses on the Net, right-hand columns, the computer will redirect to 127.0.0.1 (your computer's IP address).
Try pasting the line 127.0.0.1 into your Explorer to see the result!
195.225.176.0 - 195.225.179.255
85.255.112.0 - 85.255.127.255
66.230.175.0 - 66.230.175.255
This article was updated on May 1, 2016